Showing posts with label F. Assignment 5: Editing. Show all posts

Thursday, 7 November 2019

The Continuity System Of Editing


The continuity system of editing is a set of rules established in order to make sure that the audience remains aware of everything happening in the shot without any confusion. The five main editing techniques used are the; 180 degrees rule, shot/reverse shot, establishing and reestablishing shot, eye line match shot and the match on action. 

-The 180 degrees rule is an invisible line that you should not cross when editing your shots, meaning that if you have one shot of two characters sitting at a desk you would not typically  cut to a shot from the other side as this would be considered disorientating to the audience.
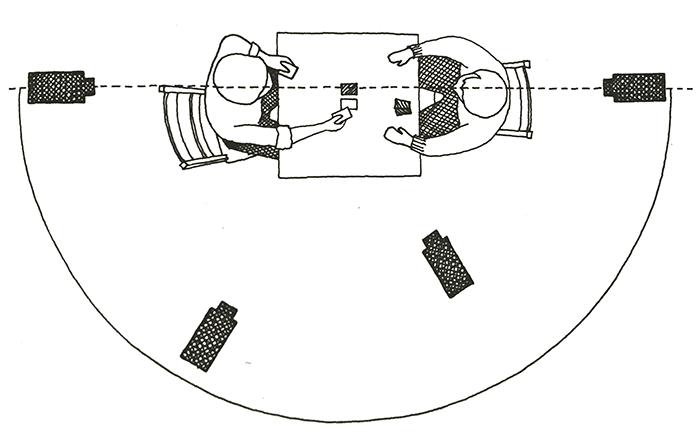
Image result for 180 degrees rule definition

- Shot/reverse shot is a technique used primarily during conversation in film. This is when the shot will cut from facing on one thing, onto another and then often back to the original character or object. When shooting the first shot will be shot at an angle towards the first person/thing, the reverse of this shot is then shot from the opposite angle, maintaining on the same side to continue the 180 degree rule.


- An establishing shot typically uses a wide shot in order to establish the context and location of a scene in a film or TV show. In a film it can also establish the setting for the entire film, showing the audience relevant information needed throughout the film.


- The eyeline match cut uses the framing to enable the audience to see through the eyes of the character. This technique can bring the audience closer to the action showing emotion in more detail whilst also highlighting more important things in the scene, such as other characters and props with significance.

- Match cut on action plays a vital role in continuity in a piece of editing. Using a match cut on action ensures that the action remains continuous regardless that it is a different shot, this makes the action recognisable as one movement to the audience. Match cut on actions can also be used to trick the audience when used efficiently.


Tuesday, 24 September 2019

My First Premier Pro Editing Project


We started off this project learning how to use a camera in manual mode, going through the settings to make sure our camera was accurately set up for filming and learning about the exposure triangle. The exposure triangle consists of three components; ISO, aperture and shutter speed. ISO affects the light sensitivity, with a higher ISO giving a grainier look to your image and a lower ISO giving a cleaner image. Aperture affects the depth of field with it being determined by an opening letting in an amount of focused light through the lens. The smaller the aperture number the larger it's opened meaning it will let more light through than a larger f-stop. A smaller f-stop also gives a blurrier depth of field than a larger f-stop which makes the depth of field visible. Shutter speed is the speed in which the curtain opens then closes, when filming we keep this at 50.

Once we knew how to make sure our shots were properly exposed and established basic control of the camera and how a tripod is safely set up we began filming. We started with static shots and then started with moving shots, experimenting with depth of field and exposure both inside and out.
Finally we began the editing process. It began with us transferring our footage onto the computers and then moving that onto premier pro. Firstly we made three 'bins' inside our new file - these were: Footage, Audio and Titles - and transferred our footage into the footage bin. I then learnt how to begin basic editing techniques including how to access the transitions, fade in and out and add audio. When adding the audio we went over the importance of copyright and what kind of sounds can be used when creating your own film, finishing with adding a title and a rolling end credit.


The last thing we did was export our film looking through the different formats and then uploading it to YouTube.


Our finished product makes use of all the features needed to have a basic knowledge of using Premier Pro and a camera when in manual. We used various amounts of different shot types to experiment with depth of field. The most successful shot in my opinion is the first shot, focusing on the bars and having the background blurry whilst still being able to make out what is going on. The most unsuccessful shot was in the corridor, this is because it is extremely out of focus.


In order to improve next time I will remember to render the project before exporting to ensure that it is at its highest possible quality.